


 Author
Lost or accidentaly deleted an important file or folder ?
Dont worry it is possible to revover pictures, videos, documents, pdf, audio mp3 files, emails or any other type of files? You can now recover deleted file from your all new mac OS X Yosmite 10.10 for free even it is deleted from trash.
Its common to delete files accidentaly and you may worry about recovering the lost file. There are many data revovery softwares which comes free and paid in the market (Internet). some ask for a payment, and some recover a part of the file and/or ask to upgrage to premium version with a payment, and some give us the exat file.
Improving the chance of Data Recovery.
It is always very important that, you should try to recover the accidentaly deleted data as soon as possible after deleting it. You shouldn't make much change in the hard disk or USB pendrive that means do not write/save more files, of changing the current folder structure, etc. The possibility of data revovery will decrease if you overwrite more file in the same Dard disk.
With this Reviewed Apps you can also recover deleted file from SD Card, USB drives, pendrives, and memory cards.
Free file recovery softwares for Mac OS X Yosemite 10.10.
#1. Data Recovery Wizard.
Its a completely free data recovery software for mac os x yosemite 10.10. You have to download the .dmg image from the link below
DOWNLOAD DATA RECOVERY WIZARD (Read above instructions for better recovery)
After installing the "Data recovery wizard"app, launch the program and in the first window you should select the file type to recover. If you accidentaly deleted a picture such as .JPG, .BMP, .PNG, etc from the desktop, you should select the "GRAPHICS" option only. So the software will not search for any other type of files and it will boost the recovery speed so quickly. Then click Continue.

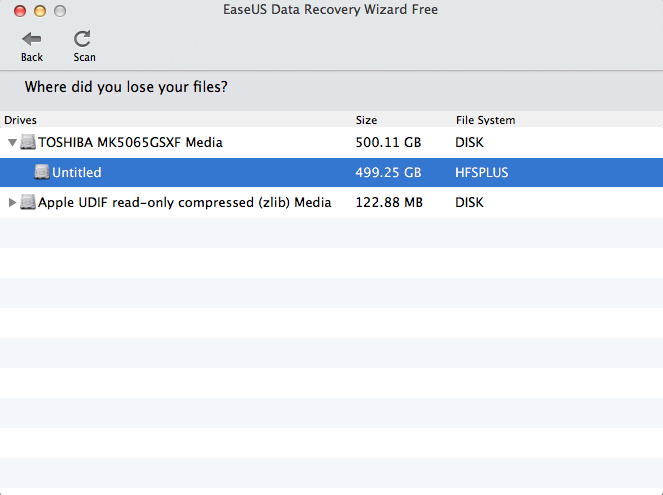
Now Select the Disc you need to scan, You can now try to recover file from system HDD or from pendrive. And click Scan. Here in my case, my HDD is Unlitled 500GB TOSHIBA HDD
 And now it will list all the available or recoverable files that deleted from your Macbook. You can select the files and select the destination folder to recover and save.
Thank you.
Dont worry it is possible to revover pictures, videos, documents, pdf, audio mp3 files, emails or any other type of files? You can now recover deleted file from your all new mac OS X Yosmite 10.10 for free even it is deleted from trash.
Its common to delete files accidentaly and you may worry about recovering the lost file. There are many data revovery softwares which comes free and paid in the market (Internet). some ask for a payment, and some recover a part of the file and/or ask to upgrage to premium version with a payment, and some give us the exat file.
Improving the chance of Data Recovery.
It is always very important that, you should try to recover the accidentaly deleted data as soon as possible after deleting it. You shouldn't make much change in the hard disk or USB pendrive that means do not write/save more files, of changing the current folder structure, etc. The possibility of data revovery will decrease if you overwrite more file in the same Dard disk.
With this Reviewed Apps you can also recover deleted file from SD Card, USB drives, pendrives, and memory cards.
Free file recovery softwares for Mac OS X Yosemite 10.10.
#1. Data Recovery Wizard.
Its a completely free data recovery software for mac os x yosemite 10.10. You have to download the .dmg image from the link below
DOWNLOAD DATA RECOVERY WIZARD (Read above instructions for better recovery)
After installing the "Data recovery wizard"app, launch the program and in the first window you should select the file type to recover. If you accidentaly deleted a picture such as .JPG, .BMP, .PNG, etc from the desktop, you should select the "GRAPHICS" option only. So the software will not search for any other type of files and it will boost the recovery speed so quickly. Then click Continue.
Now Select the Disc you need to scan, You can now try to recover file from system HDD or from pendrive. And click Scan. Here in my case, my HDD is Unlitled 500GB TOSHIBA HDD
Thank you.


