[root@server easy-rsa]# ./build-key-server server
Generating a 1024 bit RSA private key
........................++++++
....................................++++++
writing new private key to 'server.key'
-----
You are about to be asked to enter information that will be incorporated
into your certificate request.
What you are about to enter is what is called a Distinguished Name or a DN.
There are quite a few fields but you can leave some blank
For some fields there will be a default value,
If you enter '.', the field will be left blank.
-----
Country Name (2 letter code) [US]: #Press enter
State or Province Name (full name) [Newyork]: #Press enter
Locality Name (eg, city) [NewYork]: #Press enter
Organization Name (eg, company) [Servercomputing]: #Press enter
Organizational Unit Name (eg, section) [changeme]: #Press enter
Common Name (eg, your name or your server's hostname) [server]:servercomputing #input FQDN
Name [changeme]:server #Type "server"
Email Address [mail@host.domain]: #Press enter
Please enter the following 'extra' attributes
to be sent with your certificate request
A challenge password []:12345 #input any password
An optional company name []: #Press enter
Using configuration from /etc/openvpn/easy-rsa/openssl.cnf
Check that the request matches the signature
Signature ok
The Subject's Distinguished Name is as follows
countryName :PRINTABLE:'US'
stateOrProvinceName :PRINTABLE:'Province'
localityName :PRINTABLE:'NewYork'
organizationName :PRINTABLE:'Servercomputing'
organizationalUnitName:PRINTABLE:'changeme'
commonName :PRINTABLE:'servercomputig'
name :PRINTABLE:'server'
emailAddress :IA5STRING:'mail@host.domain'
Certificate is to be certified until Apr 1 07:37:52 2022 GMT (3650 days)
Sign the certificate? [y/n]:y #Press Y
1 out of 1 certificate requests certified, commit? [y/n]y #Press Y
Write out database with 1 new entries
Data Base Updated
Step4 Generate a Diffie Hellman (DH) parameter
Generate Diffie Hellman ( DH ) parameter
[root@server easy-rsa]# ./build-dh
Generating DH parameters, 1024 bit long safe prime, generator 2
This is going to take a long time
..........................+.....................................................+.................................................+......................+.....................................+..........................................+..........
(Will take about 20-30secs...)
Step5 Generate Keys and Certificates for VPN clients
Edit the vars file and add the VPN client's Country, Organisation, Email and other information. in line 64 to 68th.
[root@server easy-rsa]# vim vars
export KEY_COUNTRY="UK"
export KEY_PROVINCE="Province"
export KEY_CITY="London"
export KEY_ORG="Servercomputing1"
export KEY_EMAIL="na@na.com"
# Now save the vars file
[root@server easy-rsa]# source ./vars
NOTE: If you run ./clean-all, I will be doing a rm -rf on /etc/openvpn/easy-rsa/keys
[root@server easy-rsa]# ./build-key-pass ukclient
Generating a 1024 bit RSA private key
..............++++++
...++++++
writing new private key to 'ukclient.key'
Enter PEM pass phrase: #Enter a password to authenticate for VPN client
Verifying - Enter PEM pass phrase: #Re enter the password
-----
You are about to be asked to enter information that will be incorporated
into your certificate request.
What you are about to enter is what is called a Distinguished Name or a DN.
There are quite a few fields but you can leave some blank
For some fields there will be a default value,
If you enter '.', the field will be left blank.
-----
Country Name (2 letter code) [UK]: #Press Enter
State or Province Name (full name) [Province]: #Press Enter
Locality Name (eg, city) [London]: #Press Enter
Organization Name (eg, company) [Servercomputing1]: #Press Enter
Organizational Unit Name (eg, section) [changeme]: #Press Enter
Common Name (eg, your name or your server's hostname) [ukclient]:London-UK # a name to easily identify the VPN client
Name [changeme]:ukclient # Same as in the command
Email Address [mail@host.domain]: #Press Enter
Please enter the following 'extra' attributes
to be sent with your certificate request
A challenge password []:12345 #type a password
An optional company name []: #Press Enter
Using configuration from /etc/openvpn/easy-rsa/openssl.cnf
Check that the request matches the signature
Signature ok
The Subject's Distinguished Name is as follows
countryName :PRINTABLE:'UK'
stateOrProvinceName :PRINTABLE:'Province'
localityName :PRINTABLE:'London'
organizationName :PRINTABLE:'Servercomputing1'
organizationalUnitName:PRINTABLE:'changeme'
commonName :PRINTABLE:'London-UK'
name :PRINTABLE:'ukclient'
emailAddress :IA5STRING:'mail@host.domain'
Certificate is to be certified until Apr 1 10:04:09 2022 GMT (3650 days)
Sign the certificate? [y/n]:y #Press y
1 out of 1 certificate requests certified, commit? [y/n]y #Press y
Write out database with 1 new entries
Data Base Updated
#ukclient.crt and ukclient.key is now created in /etc/openvpn/easy-rsa/keys/ directory
transfer the two files to VPN clients
Step6: Start OpenVPN Server
[root@server easy-rsa]# service openvpn start
Starting openvpn: [ OK ]
Add OpenVPN to system Startup
[root@server easy-rsa]# chkconfig openvpn on
Step7: Client side Configuration
Download and install the OpenVPN client installer file from the below Link
OpenVPN client Download link (works with WindowsXP,Vista and Windows7)
Note: Installing client and initializing the VPN connection requires Administrator privileges.
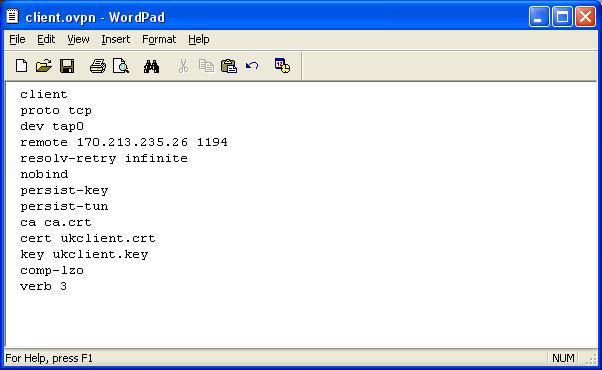
After installatling OpenVPN client, Copy C:\Program Files\OpenVPN\sample-config\client.ovpn to C:\Program Files\OpenVPN\config\client.ovpn
And open the client.ovpn file and edit like below
 |
| Click on screenshot to enlarge |
client
proto tcp
dev tap0
remote 170.213.235.26 1194
resolv-retry infinite
nobind
persist-key
persist-tun
ca ca.crt
cert ukclient.crt
key ukclient.key
comp-lzo
verb 3
#And save the client.ovpn file
#Note above 170.213.235.26 is OpenVPN server's WAN interface ip address and 1194 is the TCP port number which Server listens.
Now copy the ca.crt (created in step2), ukclient.crt, ukclient.key (created in step 5) to C:\Program Files\OpenVPN\config\ folder

Now double click on the OpenVPN GUI short cut on desktop and click on "connect" by right click on the openvpn client tray icon
And input the password when prompted (password is configured in step5 as "PEM Pass phrase")
Step8: Test client-Server connectivity
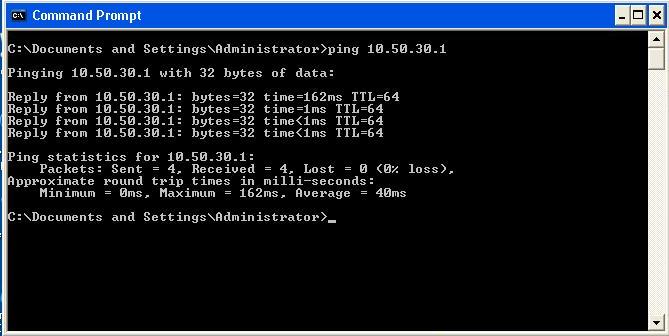
Test Connectivity by ping to server from client
Step9: Establish ip forwarding in Server
Now the connectivity is only between the VPN server anc VPN client. Other systems in the Servers's LAN cannot connect the VPN client and vice versa.
But the ultimate goal is VPN client can access all other PCs in the Server's LAN range and also All the systems in LAN can access the VPN client also. To do this the OpenVPN server can act as a router to forward ip packets from LAN to VPN client.
Run the following 4 commands
[root@server easy-rsa]# echo 1 > /proc/sys/net/ipv4/ip_forward
[root@server easy-rsa]# iptables -I FORWARD -o tap0 -j ACCEPT
[root@server easy-rsa]# service iptables save
[root@server easy-rsa]# service iptables restart
Now add the OpenVPN server's LAN ipaddress (192.168.10.50) as default gateway in all systems in the LAN.
Now all the systems in the VPNServer's LAN can communicate with the VPN clients.
Test it by ping to 10.50.30.2 from LAN systems....
Thanks for visiting and add your comments...............


 Author