Showing posts with label E-mail. Show all posts

Diffrence between IMAP and POP3

FREQUENTLY ASKED QUESTIONS
Q: What is the diffrence between POP3 and IMAP mail server ?


IMAP (Internet Nessaging Access Protocol) POP3 (Post Office Protocol)
1 Emails are stored in Mail Server. Emails are stored in your local computer. Can enable to store a copy of all mails in server.
2 Easy to reconfigure the mail account to another computer. Difficult to backup and restore the complete mail from one computer to another.
3 Emails can be checked easily from diffrent devices same time Difficult to check from different devices
4 Does not provide offline reading of old emails Provides Offline access to old emails
5 Fast reading of downloaded mails Speed depends on connection bandwidth
6 Cannot backup mails to storage devices Can backup mails to storage devices
7 Server will have high load due to mail access requests from users Server will have less load due to all mails are forwarded to local client computers


Configure E-Mail Server in Linux

This is how to install and configure an E-Mail Server in Linux. First configure SMTP and POP/IMAP server using Dovecot and Postfix. As email client use Outlook express, Mozilla Thunderbird,etc. This configurations should work in all RPM based linux distributions (Redhat, CentOS, Fedora, etc.)

Step1: Install and configure SMTP Server using postfix (Click here )


Step2: Install and configure POP/IMAP server using Dovecot (Click Here)


Step3:Create a mail accounts in mail server for mail access and set password (creating user in nologin shell is recommented) 
[root@server ~#]useradd -s /sbin/nologin james
[root@server ~#]passwd james


now the mail account "james@servercomputing.tech" is successfully created. Create more than one mail accounts in the same way and test the server by sending mail each other..


After configuring SMTP and POP/IMAP server, and mail accounts, configure your outlook(or any other) as email client


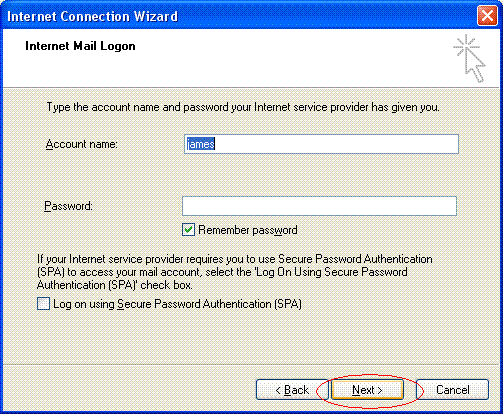
Step4: Start Outlook Express and follow the below screenshots

Select "Tools" and then "Accounts"
Select "Add" and then Select "Mail"
Type a Display name (Just a name)
type full email address


Change to "IMAP" and type server ipaddress or hostname
Click next
Finish setup
Right click on your email domain name and select "IMAP Folders"


Type username and password

Configure Dovecot POP/IMAP Mail Server in Linux

This is "How to" install and configure POP/IMAP server using Dovecot . This configurations should work in all RPM based linux distributions (Redhat, CentOS, Fedora, etc.)


Step1: Install Dovecot package
[root@server ~#]yum install dovecot


Step2: Edit the dovecot configuration file /etc/dovecot/dovecot.conf
[root@server ~#]vi /etc/dovecot/dovecot.conf


#In the 31st line, enable line and edit 
listen = *
#(Save the dovecot.conf file)

Step3: Edit configuration file /etc/dovecot/conf.d/10-auth.conf
#In the 9th line, enable the line, and edit as below
disable_plaintext_auth = no

#In the 97th line, Edit like below
auth_mechanisms = plain login
(Now save the 10-auth.conf file)

Step4: Edit configuration file /etc/dovecot/conf.d/10-mail.conf
[root@server ~#]vi /etc/dovecot/conf.d/10-mail.conf

#in the 30th line, enable it, and edit like below
mail_location = maildir:~/Maildir
(Save the 10-mail.conf file)

Step5:Edit the configuration file /etc/dovecot/conf.d/10-master.conf
[root@server ~#]vi /etc/dovecot/conf.d/10-master.conf

#Edit the lines from 84 to 88 as below (also enable these lines by removing the "#" infront of all lines ) 
#(the lines from 84 to 88 should be in the below order, you may need to add only 2 new lines)
unix_listener /var/spool/postfix/private/auth {
    mode = 0666
    user = postfix
    group = postfix
  }
(Now save the 10-master.conf file)

Step6: Start the Dovecot daemon
[root@server ~#]service dovecot start

[Important: By default Dovecot server will listen on port  143/TCP, so you should open this port in firewall or Click here to Disable firewall]


Continue building your Mail server
Related Topics: How to configure SMTP server using Postfix in Linux  (Click Here)
Related Topics: Final Configurations after configuring Postfix and Dovecot (Click Here)

Configure Postfix SMTP mail Server in Linux

This is "How to" install and configure SMTP mail server using Postfix . This configurations should work in all RPM based linux distributions (Redhat, CentOS, Fedora, etc.)

Step1:Install postfix via yum (in latest CentOS/Redhat it will be preinstalled, perform a fresh install postfix in Fedora and CentOS5 or older)
Verify the postfix is installed by default by below command
[root@server ~#]rpm -q postfix
[root@server ~#]yum install postfix              (can use this command  update to latest if postfix is preinstalled)

Step2: Edit the postfix configuration file " /etc/postfix/main.cf " is a file with 676 lines 
[root@server ~#]vi /etc/postfix/main.cf

# in the 75th line, uncomment by removing "#" and specify your required hostname (hostname is used with mail id, so email IDs will be look like user@servercomputing.tech)
myhostname = servercomputing.tech

#in the 83rd line, uncomment and specify your domain name
mydomain = tech

#in the 99th line, enable it (remove #)
myorigin = $mydomain

#In 116th line, specify interfaces which server allows requests(you can set to all or any specific network interfaces) 
inet_interfaces = all

#in the 119th line specify the ip version (ipv4 or ipv6)
inet_protocols = ipv4

#in the 164th line, change like below
mydestination = $myhostname, localhost.$mydomain, localhost, $mydomain

#In the 264th line, enable the line and add your client network( if 192.168.10.0/24)
mynetworks = 127.0.0.0/8, 192.168.10.0/24

#in 418th line, enable the line and edit like below
home_mailbox = Maildir/

#In 545th line, enable the line by removing the "#"
header_checks = regexp:/etc/postfix/header_checks

#In 546th line, add like below
body_checks = regexp:/etc/postfix/body_checks

#In 571th line, add like below
smtpd_banner = $myhostname ESMTP

#Add the following 7 lines to bottom of the file (last two lines are actually 1 line)
smtpd_sasl_type = dovecot
smtpd_sasl_path = private/auth
smtpd_sasl_auth_enable = yes
smtpd_sasl_security_options = noanonymous
smtpd_sasl_local_domain = $myhostname
smtpd_client_restrictions = permit_mynetworks,reject_unknown_client,permit
smtpd_recipient_restrictions = permit_mynetworks,permit_auth_destination,permit_sasl_authenticated,reject


#(Now save the main.cf file)

Step3: Edit /etc/postfix/header_checks file
[root@server ~#]vi /etc/postfix/header_checks

#in the 330th line add the following 2 lines       (just below to  line:   "header_checks" )
/^From:.*<#.*@.*>/ REJECT
/^Return-Path:.*<#.*@.*>/ REJECT
(save the header_checks file)

Step4: create a new file named body_checks in /etc/postfix/
[root@server ~#]vi /etc/postfix/body_checks

#Add the below one line
/^(|[^>].*)example.com/ REJECT

#(Save the body_checks file)

Step5:Start/Restart the postfix daemon
[root@server ~#]service postfix start


[Important: By default postfix server will listen on port 25/TCP. So you should open this port is firewall or click here to Disable Linux firewall.]


Continue building your Mail server
Related Topics:How to configure POP/IMAP server using Dovecot in Linux  (Click Here)
Related Topics:Final Configurations after configuring Postfix and Dovecot (Click Here)

Related Posts Plugin for WordPress, Blogger...

 
Design by Free WordPress Themes | Bloggerized by Lasantha - Premium Blogger Themes | Bluehost Coupons